


Table of contents
Hello everyone,
Git branching is a powerful feature of the Git version control system that allows developers to create and manage multiple branches of code within the same project. A branch in Git is simply a pointer to a specific commit in the project's history.
Git branching is a core feature of the Git version control system, which allows developers to create multiple isolated branches in a repository, each containing a distinct set of changes. Branching allows developers to work on different features or bug fixes simultaneously, without interfering with each other's work.
Here are some basic concepts and commands to get you started with Git branching:
To create a new branch in Git, you can use the git branch command, followed by the name of the new branch:
Create a new branch: To create a new branch in Git, use the
git branchcommand followed by the name of the new branch. For example, thegit branch feature-branchcreates a new "feature branch" branch.git branch <new_branch_name>Switch to a branch: To switch to a branch in Git, use the
git checkoutcommand followed by the name of the branch. For example, thegit checkout feature branchswitches to the "feature-branch" branch.git checkout <new_branch_name>Alternatively, you can use the
git checkoutcommand with the-boption to create a new branch and switch to it in one step:git checkout -b <new_branch_name>Working on a branch: Once you've created and switched to a new branch, you can make changes to the codebase and commit them, as usual, using the "git add", "git commit", and "git push" commands.
Merge branches: To merge changes from one branch into another branch, use the
git mergecommand followed by the name of the branch to merge. For example, if you are on the "master" branch and want to merge changes from the "feature-branch" branch, use the commandgit merge feature-branch.When you're ready to merge your changes back into the main codebase, switch to the main branch and use the "git merge" command followed by the name of the branch you want to merge. For example, "git checkout master" followed by "git merge my-feature-branch" merges the changes from the "my-feature-branch" branch into the "master" branch.
Delete a branch: To delete a branch in Git, use the
git branch -dcommand followed by the name of the branch. For example,git branch -d feature-branchdeletes the "feature-branch" branch.View branches: To view a list of branches in Git, use the
git branchcommand. The branch that is currently checked out will be indicated with an asterisk (*).# To see all local and remote branches git branch -aCreate and switch to a new branch in one command: To create a new branch and switch to it in one command, use the
git checkout -bcommand followed by the name of the new branch. For example,git checkout -b feature-branchcreates a new " feature-branch " branch and switches to it.git checkout -b branch-name
These are just some basic concepts and commands to get started with Git branching. Branching in Git is a powerful feature that allows developers to work on multiple features or fixes simultaneously without interfering with each other's work. It's an essential tool for any team working on a project with a significant codebase.
Task 1: Add a text file called version01.txt inside the Devops/Git/ with “This is first feature of our application” written inside. This should be in a branch coming from
master, [hint trygit checkout -b dev], switch todevbranch ( Make sure your commit message will reflect as "Added new feature"). [Hint use your knowledge of creating branches and Git commit command]
- version01.txt should reflect at local repo first followed by Remote repo for review. [Hint use your knowledge of Git push and git pull commands here]
Add new commit in
devbranch after adding below-mentioned content in Devops/Git/version01.txt: While writing the file make sure you write these lines
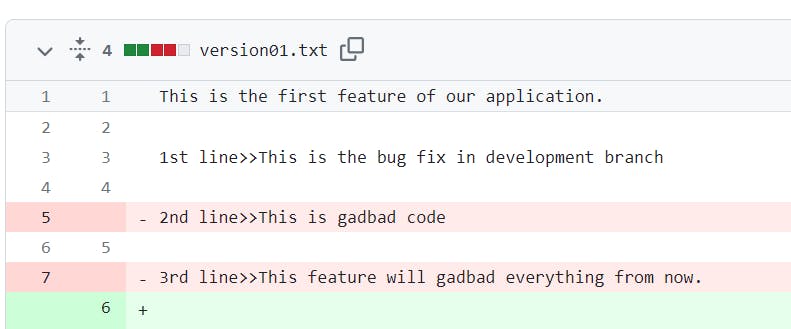
1st line>> This is the bug fix in development branch
Commit this with message “ Added feature2 in development branch”
2nd line>> This is gadbad code
Commit this with message “ Added feature3 in development branch
3rd line>> This feature will gadbad everything from now.
Commit with message “ Added feature4 in development branch
Restore the file to a previous version where the content should be “This is the bug fix in development branch” [Hint use git revert or reset according to your knowledge]
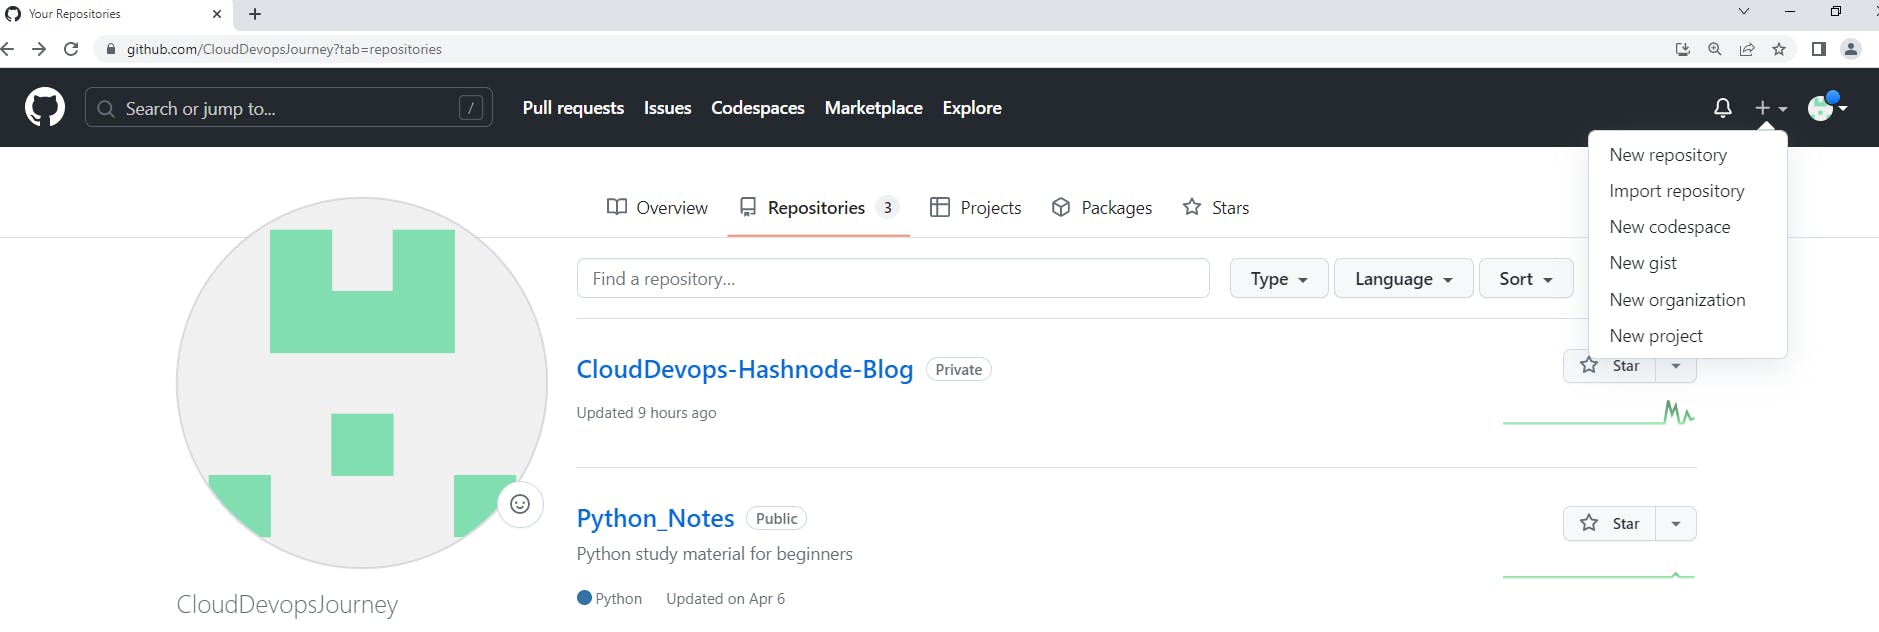
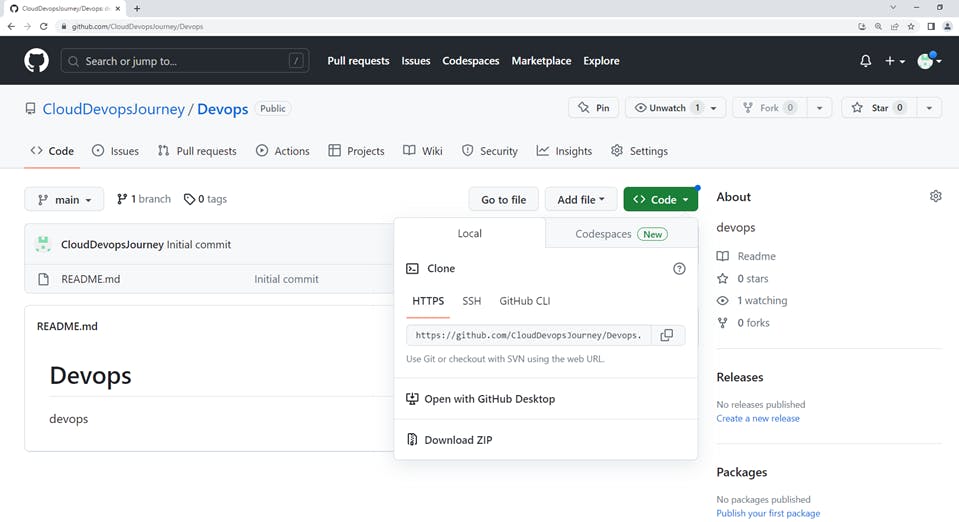
You can create a new repository on your account
Use the drop-down menu in the upper-right corner of any page, and select New repository.
After clicking on New repository --> Create a new repository page will appear.
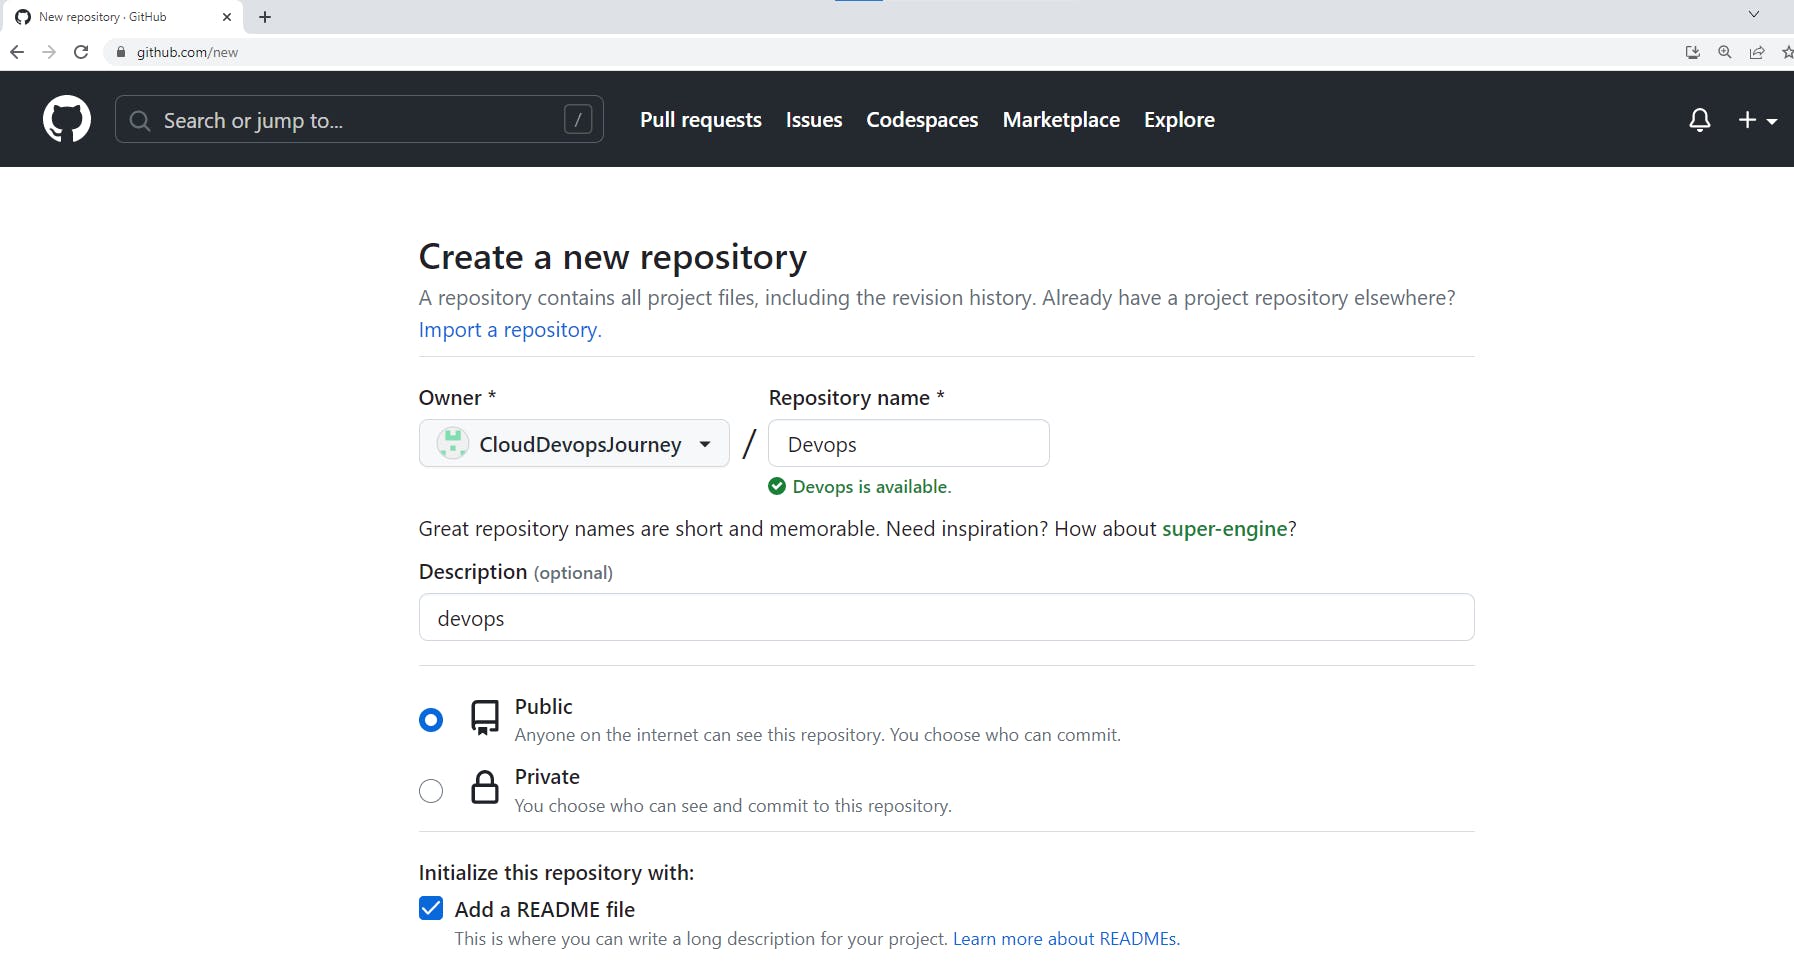
Type a name for your repository, and an optional description.
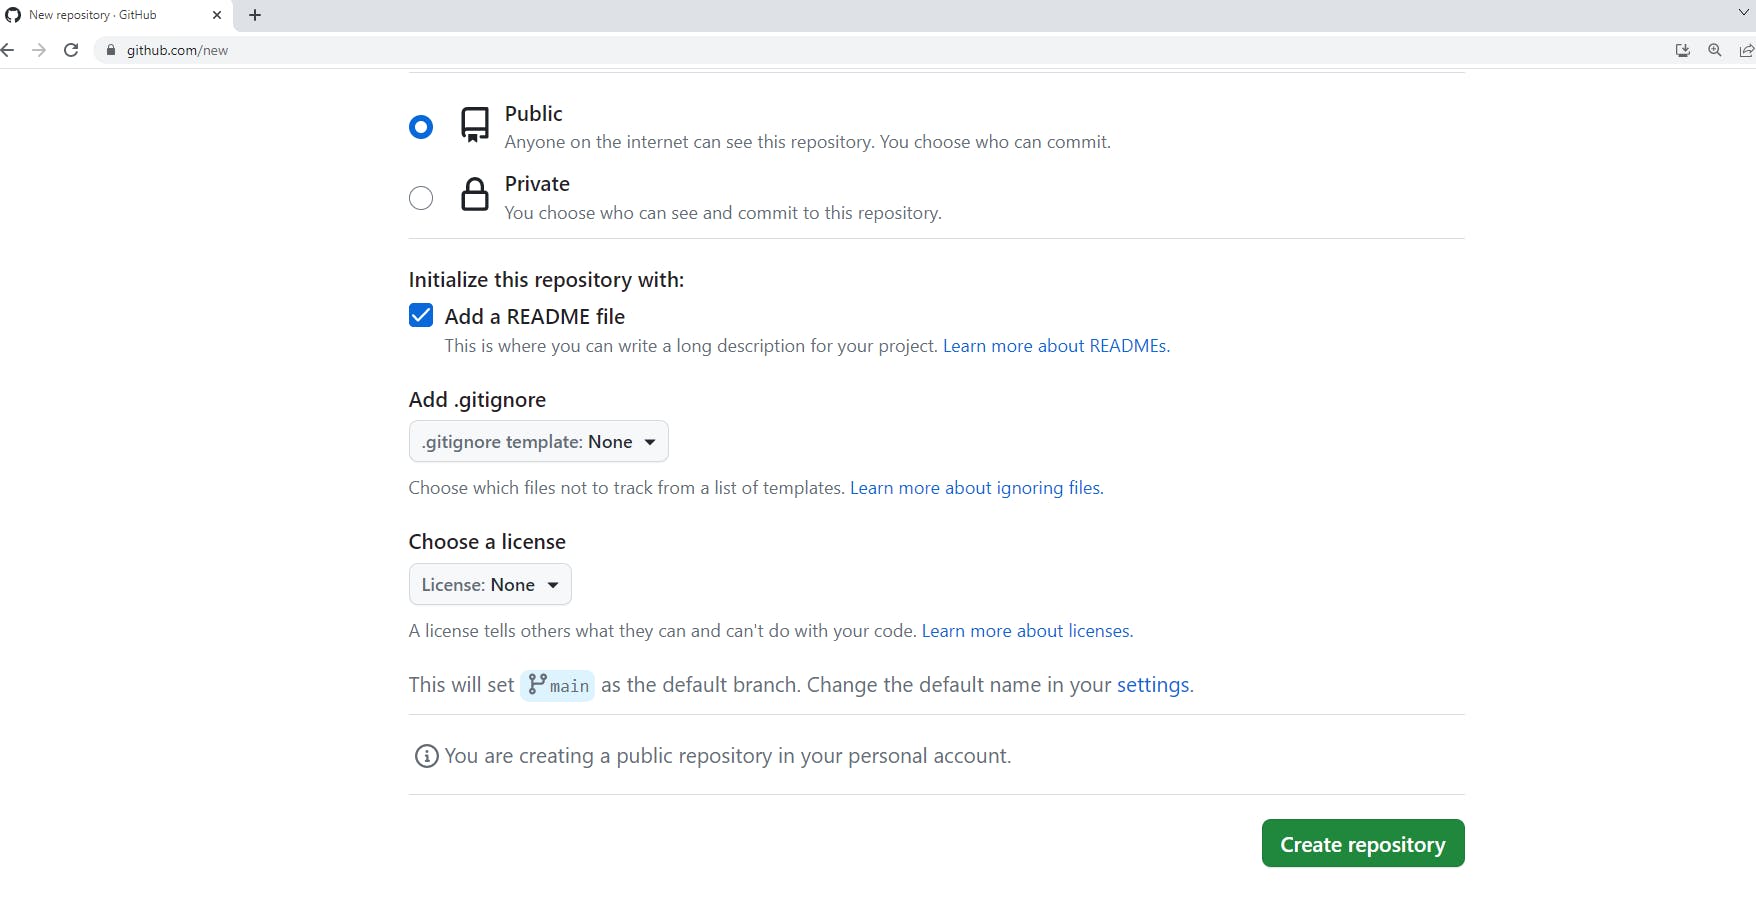
click on Create repository
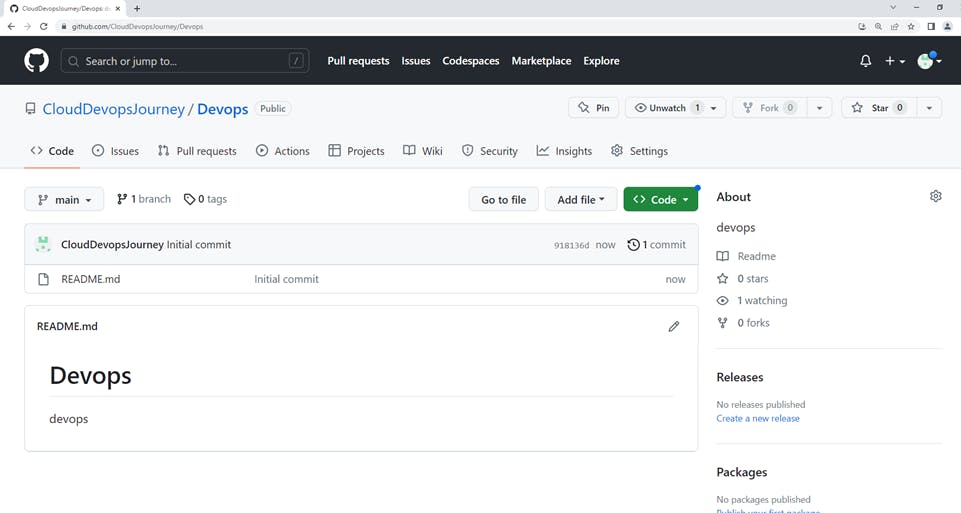
select the repository name i.e. "Devops" and navigate to the main page of the repository. The green button is named <>Code and click on it. The GitHub URL will appear. Copy the HTTPS GitHub URL.
After copying GitHub URL. The next step is open GitBash on your local computer.
When you create a repository on GitHub.com, it exists as a remote repository. You can clone your repository to create a local copy on your computer and sync between the two locations.
Use git clone to copy an existing repository into a new directory on your local computer.
# Copy the HTTPS URL from your GitHub and paste it inside <URL>
git clone <URL>

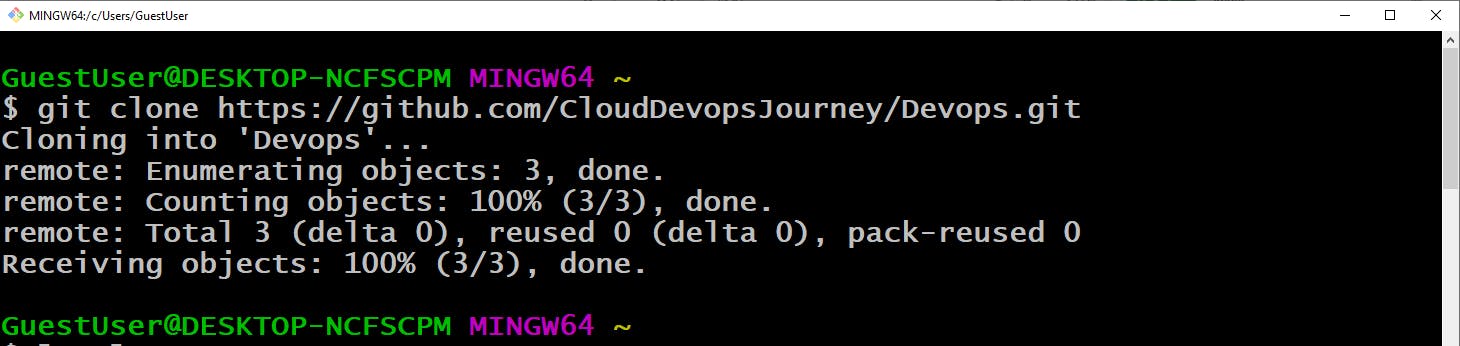
Successfully cloned to the local computer.
Now, go to the Devops folder with the command cd Devops. cd is an acronym for 'Change Directory'.
cd Devops
Type the following command cd <path of the directory> and press enter. See that the directory has been changed.

Now inside the Devops folder make another folder git with the help of mkdir git
# Create a new directory git
mkdir git

Now, use the ls command It is used to 'list' contents of the current working directory.
# lists the current directory contents
ls

go to the git directory using the command cd git
# Moving inside git directory
cd git

List all of the branches in your repository. This is synonymous with git branch --list.
git branch

or
git branch --list

Before creating a new branch, use git init to create a new Git repository for an existing project/folder to become a Git repository.

Now next step is creating a new branch "dev" and switching the main branch to the dev branch
# Creating a new branch "dev" and switching to it from main branch
git checkout -b dev
After using the git checkout -b dev command. master branch --->dev branch

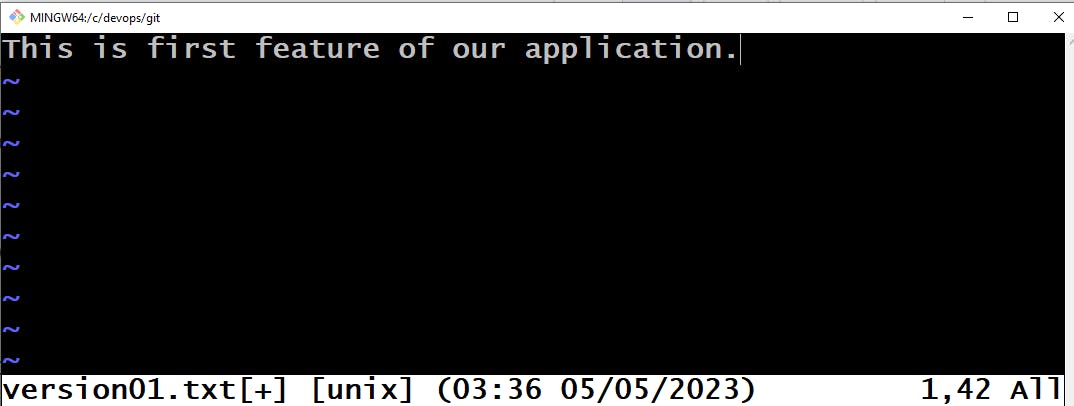
Create a new file with the help of the vi editor
vi <filename_NEW> or <filename_EXISTING>
File name version01.txt inside the Devops/Git directory using any editor of your choice and add some context inside it "This is the first feature of our application."
vi version01.txt

Now edit vi version01.txt file and add a new line in the file. with the help of the vi editor.
vi editor will open and press the Esc button -->press i for insert Mode--> modify file --> press Esc then :wq! and press Enter file will save.
You can check the content with the help of the cat command.
cat version01.txt
Now we will add the version01.txt file to the staging area using the command
git add <filename> or git add .
git add version01.txt
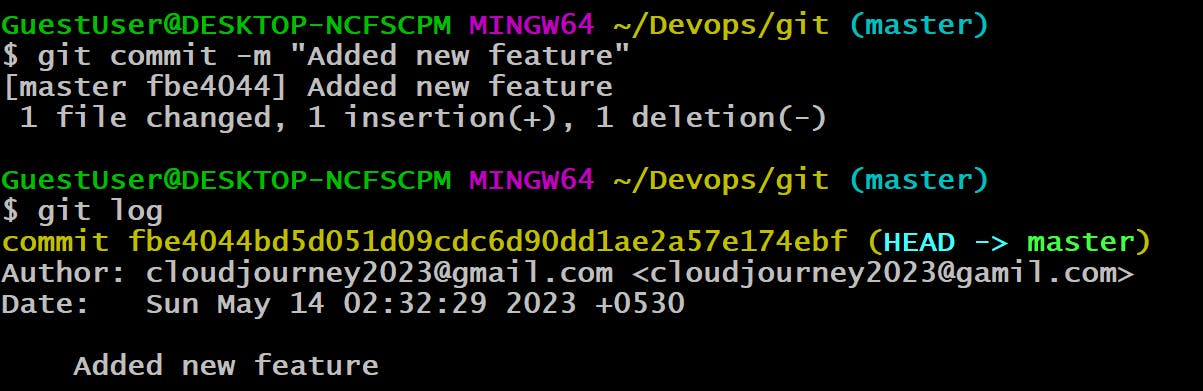
finally, commit the file using git commit -m 'Message'
git commit -m "Added new feature"

# git log command to view all commits in our repo.
git log
git status command tells the current state of the repository.
git status

git push origin master command updates the remote repository with local commits.
git push origin master
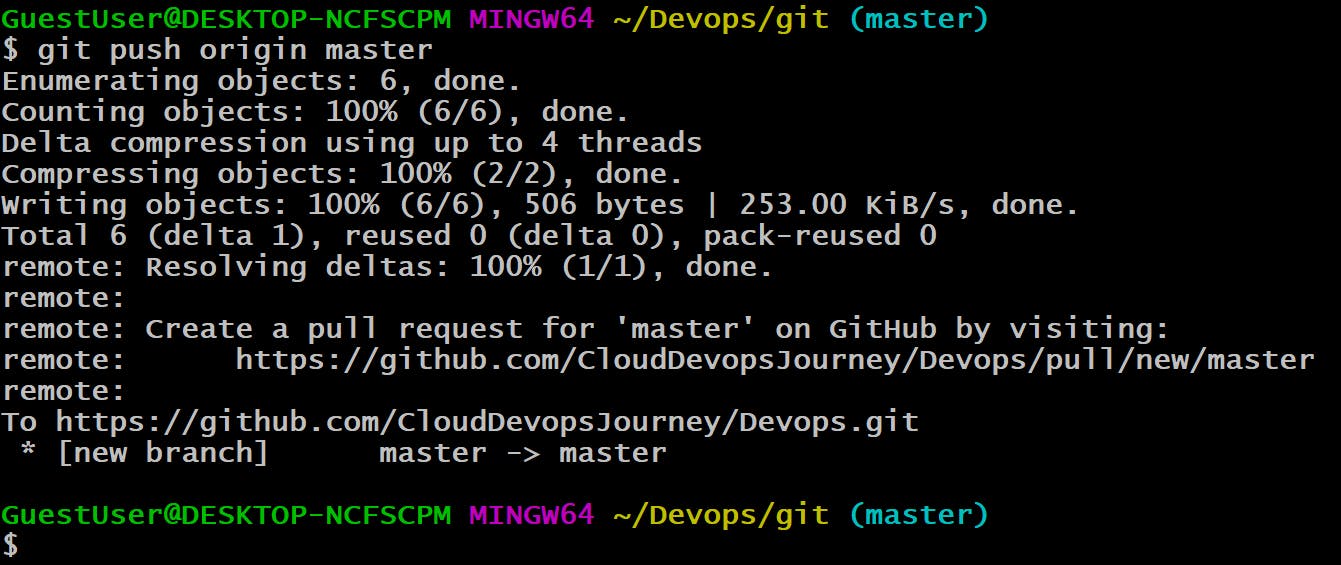
Here, we can see that Simply use a git push origin master command on subsequent pushes of the master branch to the remote repo.
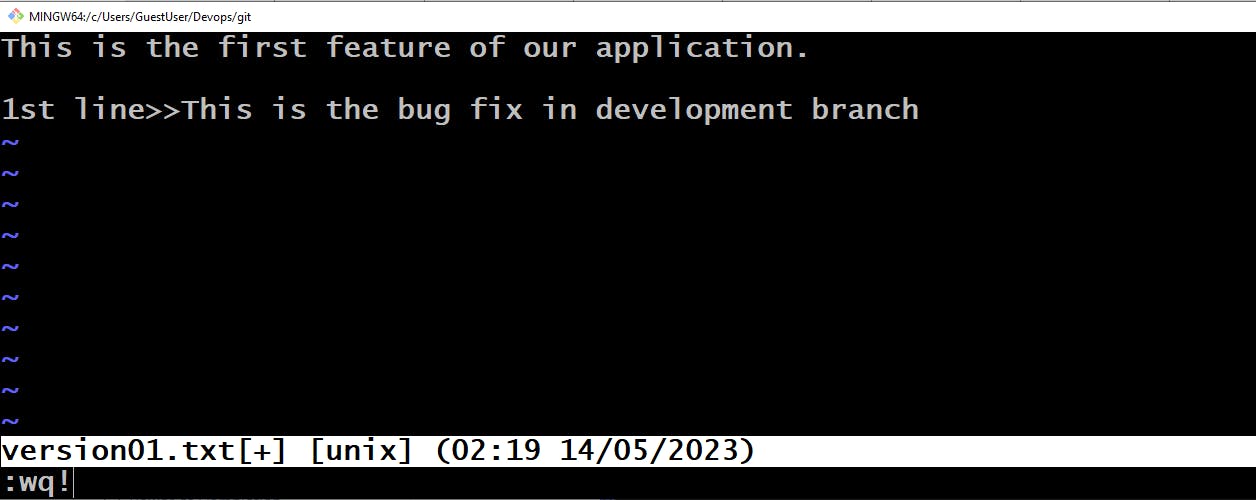
Add a new commit in the master branch after adding the below-mentioned content in Devops/Git/version01.txt: While writing the file make sure you write these lines
- 1st line>> This is the bug fix in development branch
vi version01.txt
Now edit the vi version01.txt file and add a new line in the file with the help of the vi editor.
add the content "1st line>> This is the bug fix in development branch" to it and save.
vi editor will open and press the Esc button -->press i for insert Mode--> modify file --> press Esc then :wq! and press Enter file will save.


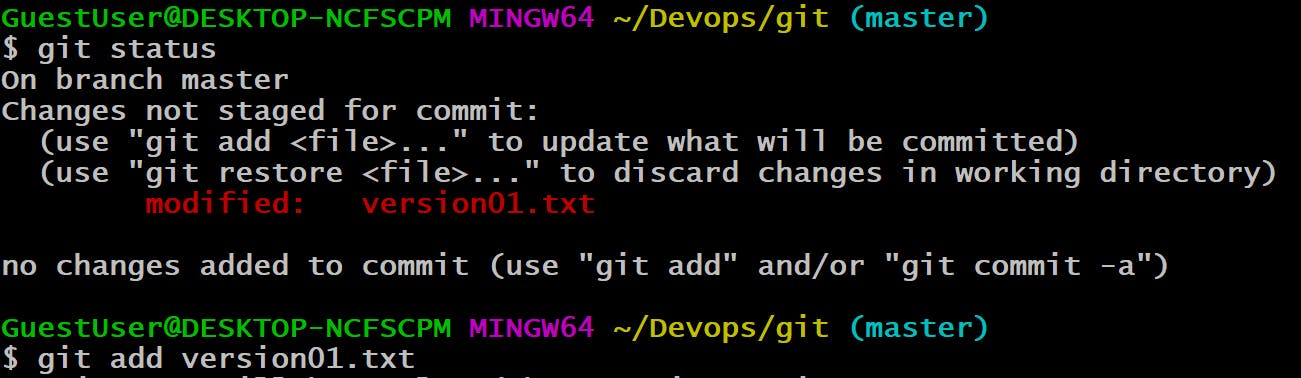
git status command for the current state of the repository. So, in a version01.txt file modified status is showing because we have added content to the file.
will add it to the staging area using the command git add <filename> and finally, commit the file using git commit -m 'Message'
git add version01.txt
git commit -m "Added feature2 in development branch"

Similarly, go inside the vi editor vi version01.txt and add a new context "2nd line>> This is gadbad code." and we will add and commit these changes using the same commands as above with the commit message "Added feature3 in development branch."
vi editor will open and press the Esc button -->press i for insert Mode--> modify file --> press Esc then :wq! and press Enter file will save.
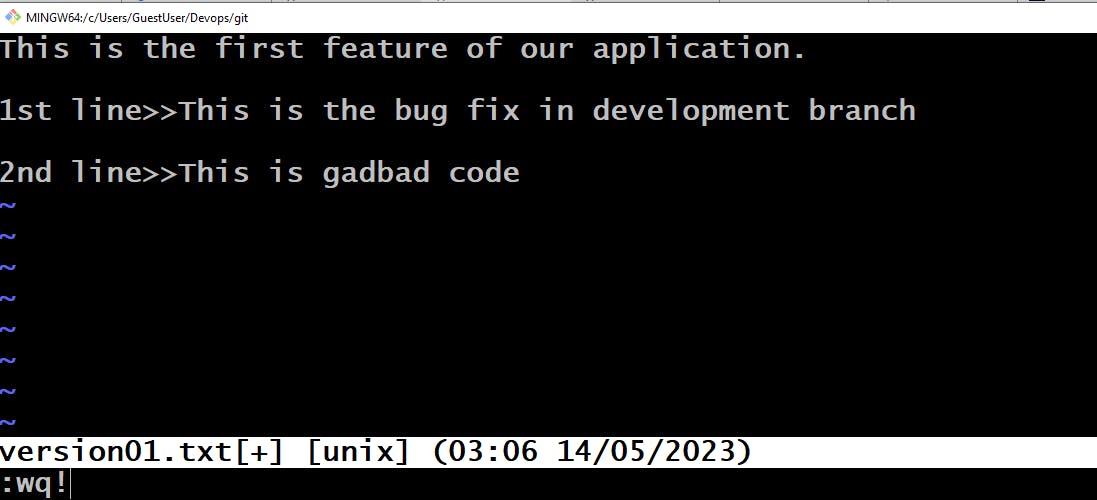
git add version01.txt

git commit -m "added fetaure3 in development branch"

The git log command displays all of the commits in a repository's history.
Also, we can use oneline as an option for the git log command. The main purpose of this command is to print a single commit in a single line as output when the git log command is executed using this option. Using this option, the commits are printed in a pattern - the commit SHA's initial 7 characters than the commit message.
git log --oneline

Once again repeat the same steps, go inside the vi editor vi version01.txt and add a new context in the version01.txt file "3rd line>> This feature will gadbad everything from now." and add this file and commit using the message “Added feature4 in development branch".

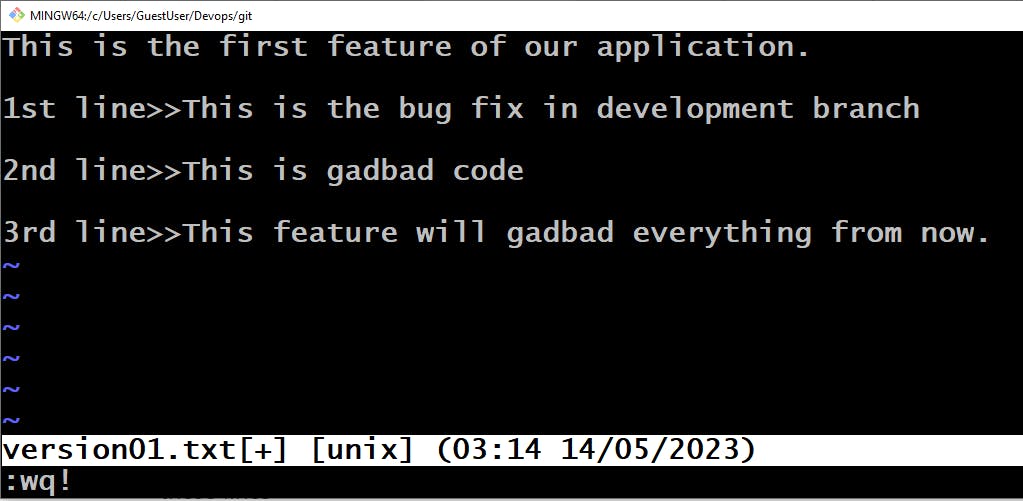
will add it to the staging area using the command git add <filename> and finally, commit the file using git commit -m 'Message'
git add version01.txt

git commit -m "Added feature4 in development branch"

once again check all commit history with git log --oneline command

pull the repository from remote using the command git pull origin master and to push the file into the repository run the command git push origin master
git push origin master
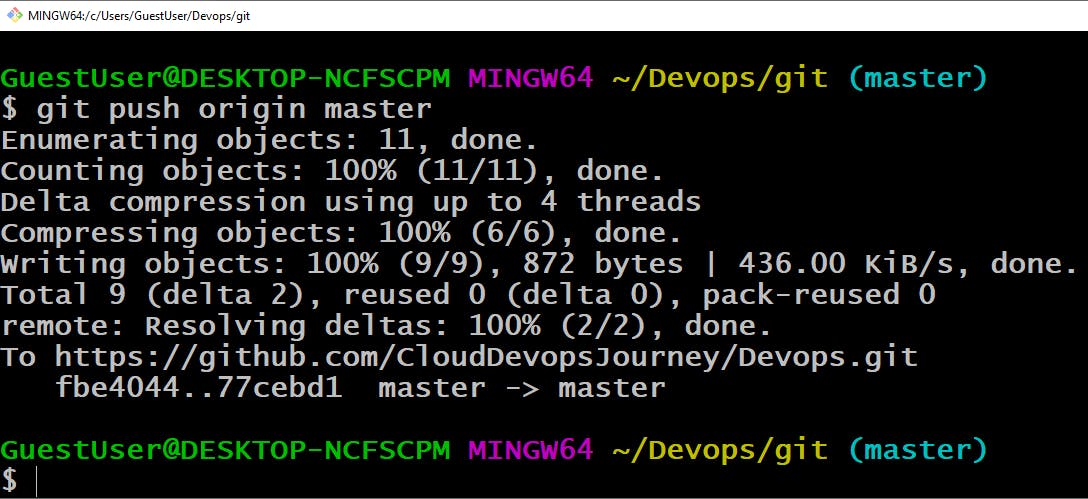
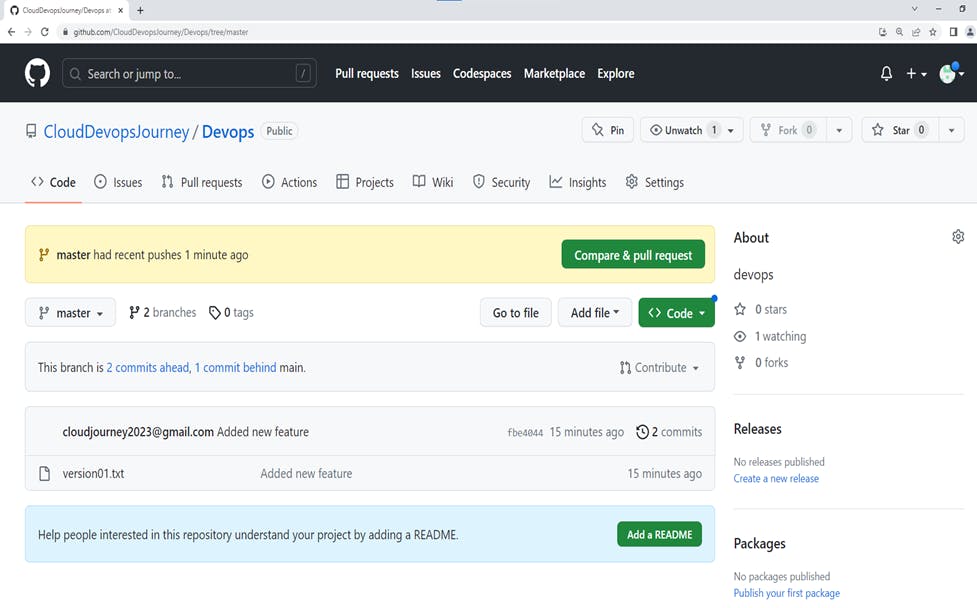
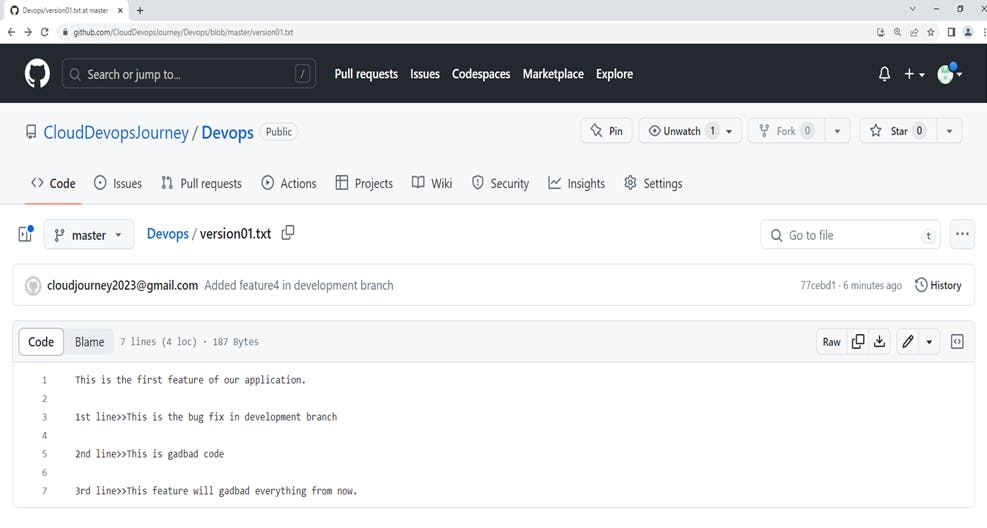
Now just refresh GitHub once again you can see all changes done in the remote repository.
git reset <commithash*>* is the command we use when we want to move the repository back to a previous commit, discarding any changes made after that commit.
Note:commithash being the first 7 characters of the commit hash we found in the log


you can check Changes in a remote repository.
Task 2:
Demonstrate the concept of branches with 2 or more branches with screenshot.
add some changes to
devbranch and merge that branch inmasteras a practice try git rebase too, see what difference you get.
Let's get started, First, use the git branch command to confirm which branch you are currently in. The currently selected branch is master, as may be seen below.
To see local branch names, open your terminal and run git branch
git branch

Now next step, create dev1,dev2,dev3 branches.
The git branch <new-branch name> command can be used to create a new branch. Once created you can then use git checkout new_branch to switch to that branch.
git branch <new-branch name>
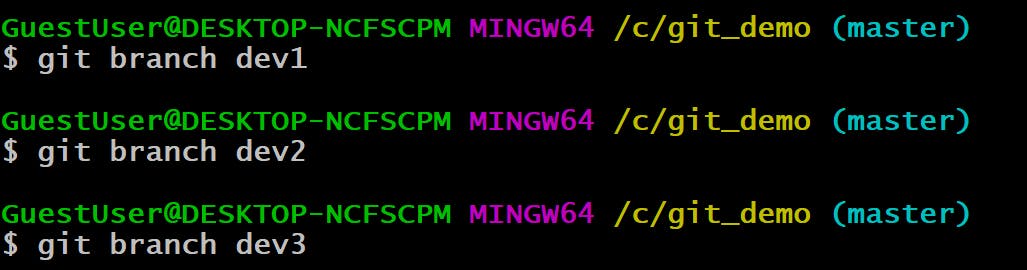
Now we can check with the help of the command git branch all three branches are successfully created.
# display all branches
git branch

The Asterisk (*) in front of the master indicates that we are presently in, which master branch can be seen by listing all the branches.
Now here we can rename the branch name dev3 to dev
git branch -m my_old_branch_name new_branch_name
git branch -m dev3 dev

Here, successfully changed the branch name. dev3 to dev
now, switch the branch master to the dev using the command git checkout
he git checkout command lets you navigate between the branches created by git branch.
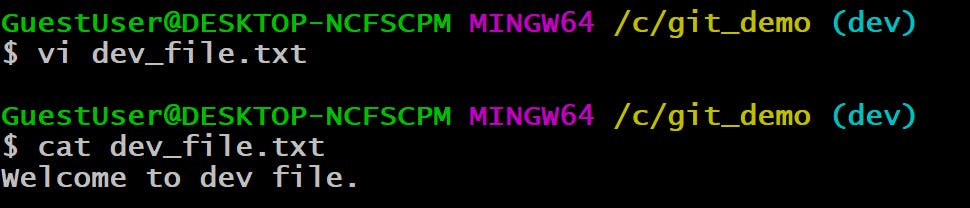
git checkout dev

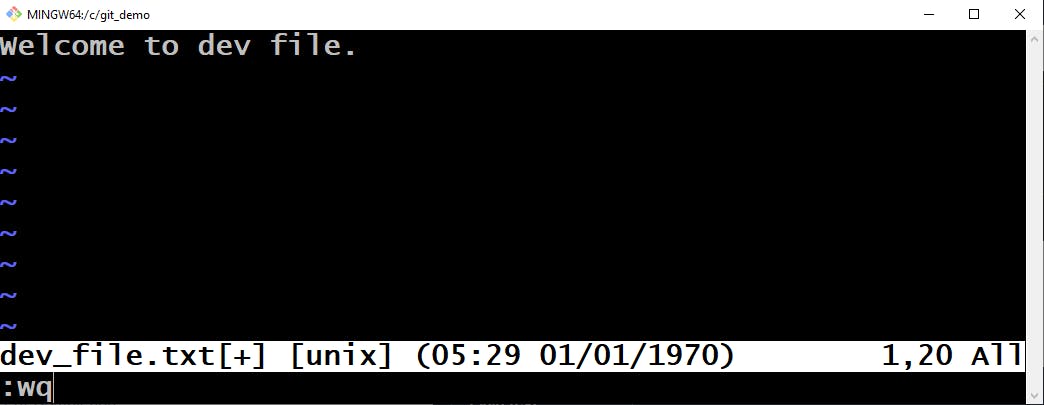
now create a new file using any editor, here we will use the vi editor
# create a new file
vi dev_file.txt

# display content in file
cat dev_file.txt
Now add this file to the staging area: git add . or git add dev_file.txt
git add dev_file.txt

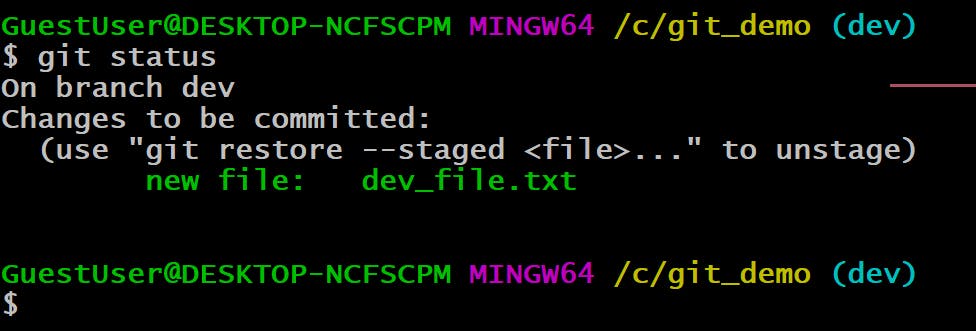
Verify the status using command: git status
git status
commit files to a Git repository.
Enter git commit -m '<commit_message>' at the command line to commit new files/changes to the local repository.
git commit -m "first dev file"

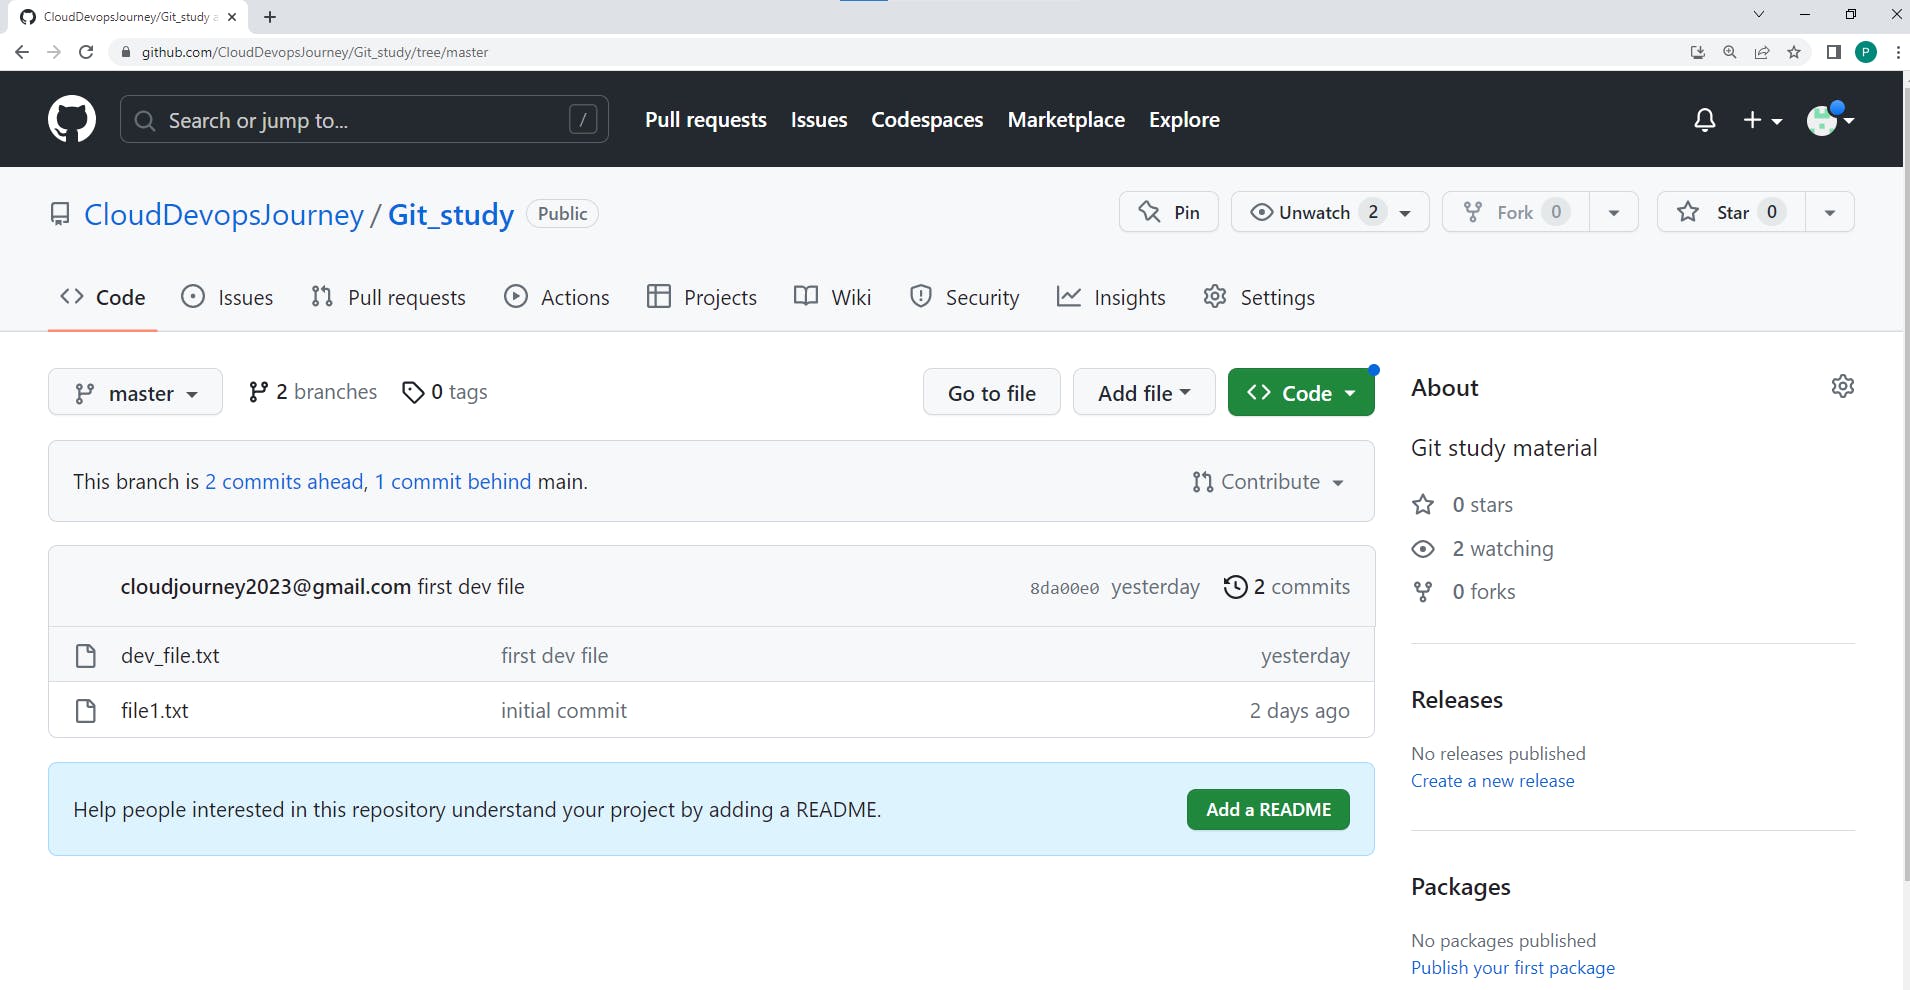
Return to the master branch and continue by merging the development branch with it.
git checkout master
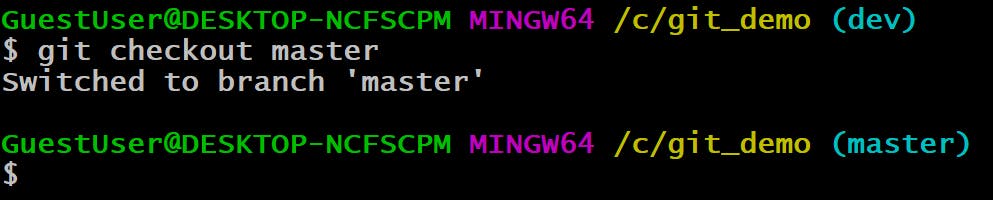
we can successfully switch to the master branch from the dev branch.
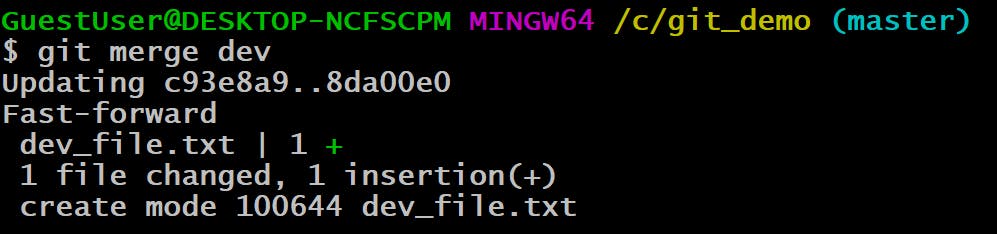
The git merge <branch_name> command lets you take the independent lines of development created by the git branch and integrate them into a single branch.
git merge dev
finally now git push -u origin master is used for pushing local content to GitHub. In the code, the origin is your default remote repository name and '-u' flag is upstream, which is equivalent to '-set-upstream.' and the master is the branch, name.upstream is the repository that we have cloned the project.
git push -u origin master
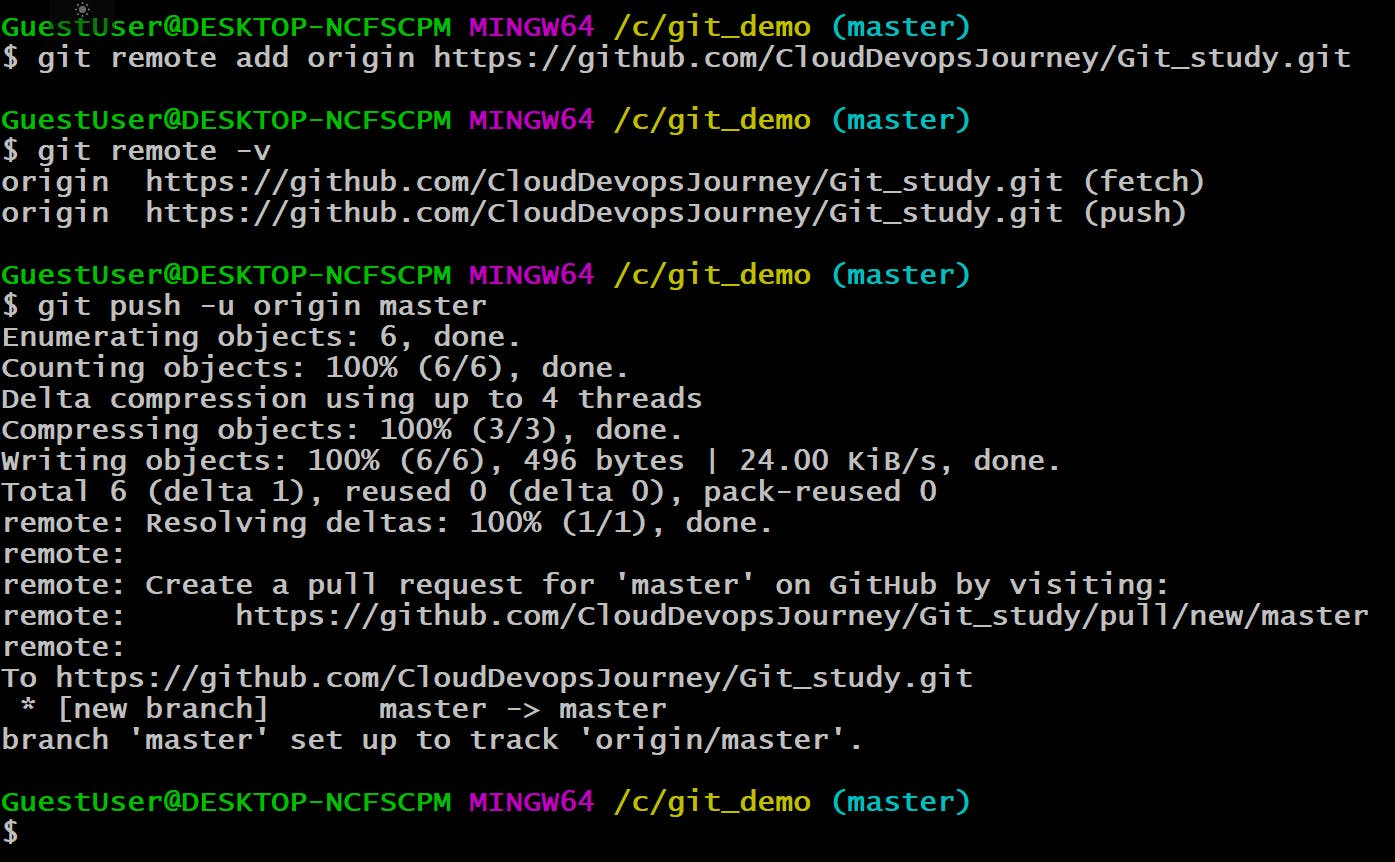
Go to your GitHub account and verify the file added to your remote repository.
git rebase command allows you to easily change a series of commits, modifying the history of your repository.

🎉 Task Done👍 Day 10 of #90daysofdevops 💯
In this article, we have covered the Day 10 task related to git branch, git add, git commit, git checkout, git rebase.
If you enjoyed this article please like it and share it with your friends and colleagues!
Thank you for reading🤓